YOLOv5理解学习
YOLOv5 理解学习
YOLOv5还没有论文出现,只公布了源码,本篇是翻译的YOLOv5 github仓库中的Issue
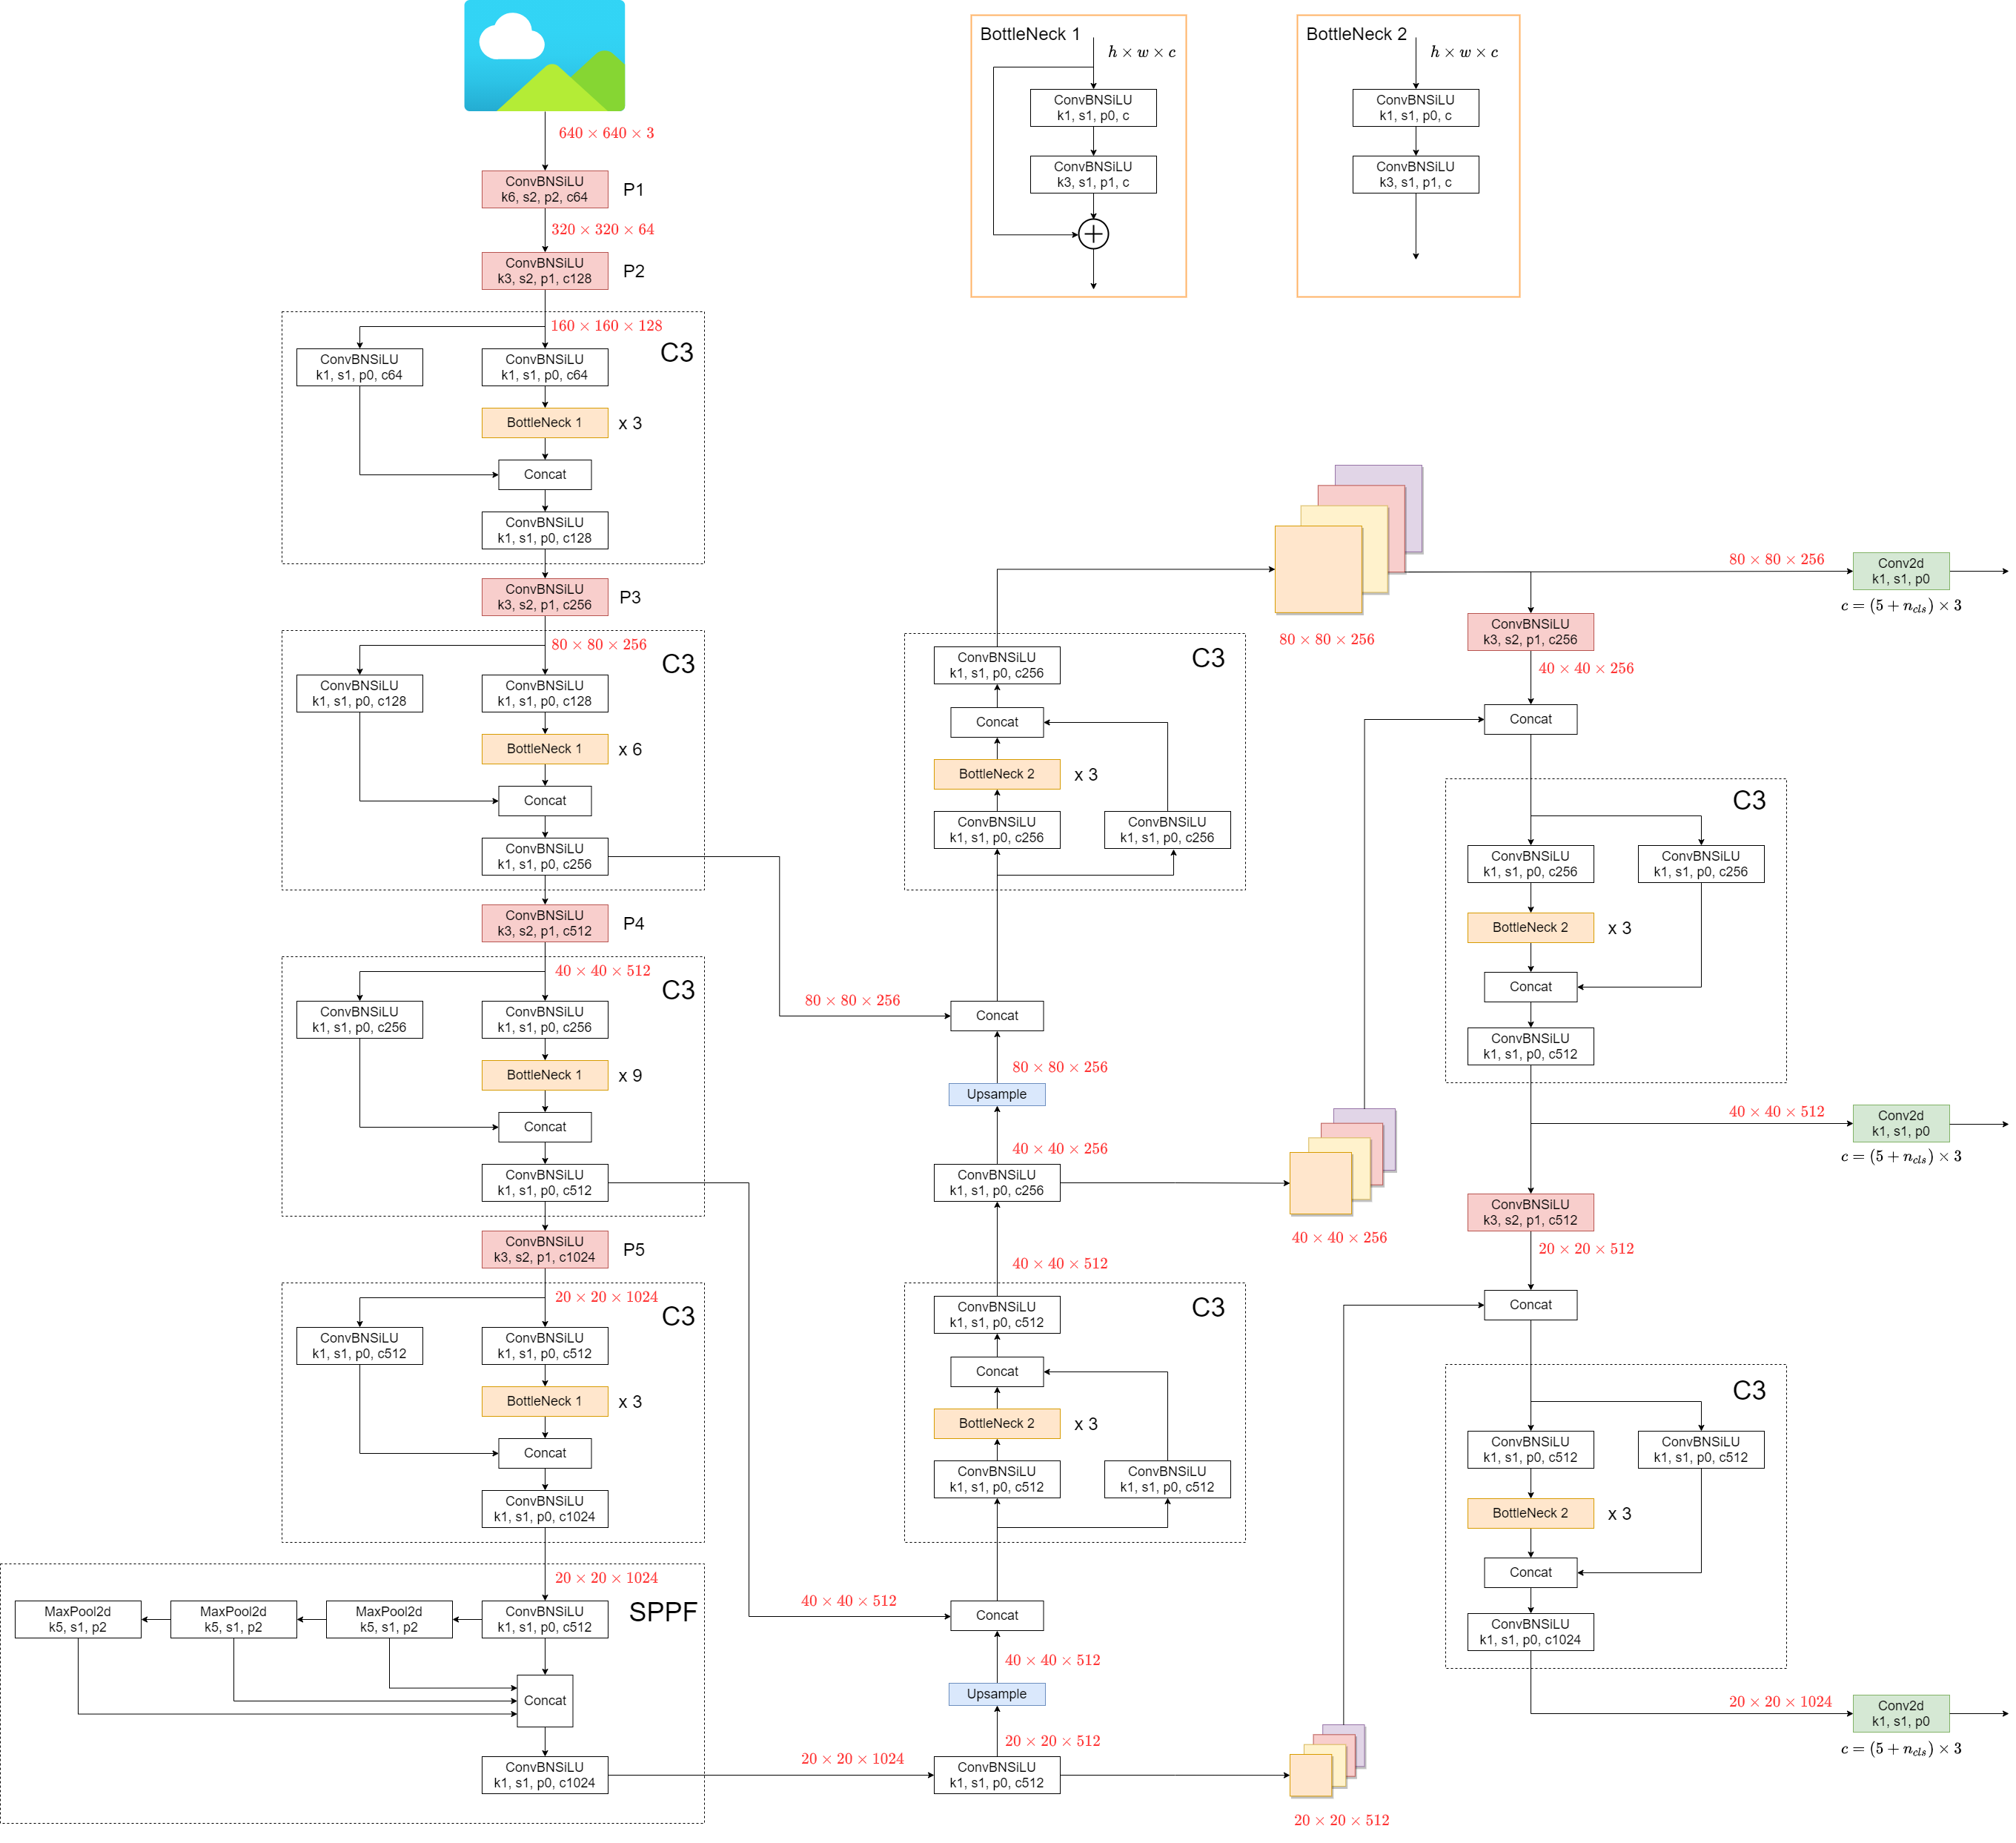
YOLOv5 模型架构
YOLOv5组成
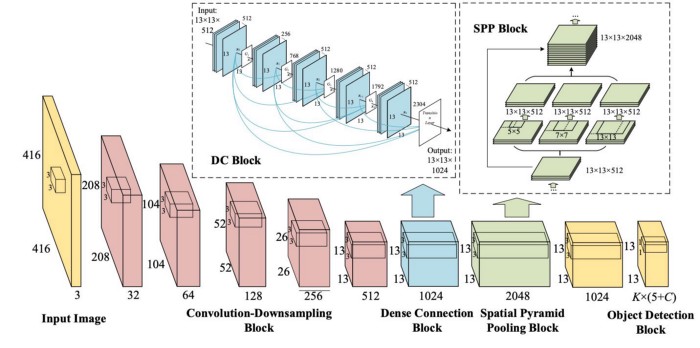
YOLOv5(v6.0/6.1)和普通的目标检测器相类似,由三个部分组成,分别为Backbone,Neck,Head,它们分别为
- Backbone:
New CSP-Darnet53 - Neck:
SPPF,New CSP-PAN - Head:
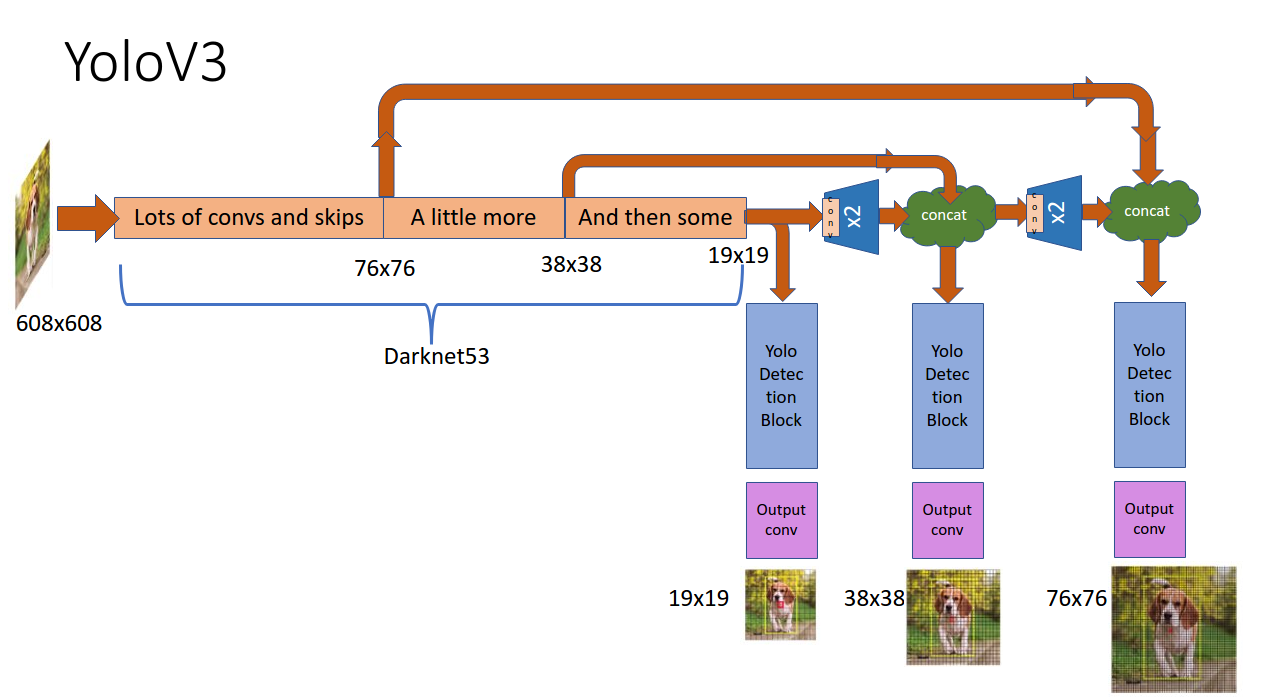
YOLOv3 Head
YOLOv5架构图
YOLOv5 v6.0 与 YOLOv5 之前的版本,相比有一些小的变化
将
Focus结构替换成为 $6\times6$Conv(这个在 Issue 4825问题中有详细说明,是由开发者向ultralytics提出的验证,作者验证通过之后,便更新了这一点,不得不感叹社区的和谐 )1
2
3
4
5
6
7
8
9
10class Focus(nn.Module):
# Focus wh information into c-space
def __init__(self, c1, c2, k=1, s=1, p=None, g=1, act=True): # ch_in, ch_out, kernel, stride, padding, groups
super().__init__()
self.conv = Conv(c1 * 4, c2, k, s, p, g, act)
# self.contract = Contract(gain=2)
def forward(self, x): # x(b,c,w,h) -> y(b,4c,w/2,h/2)
return self.conv(torch.cat((x[..., ::2, ::2], x[..., 1::2, ::2], x[..., ::2, 1::2], x[..., 1::2, 1::2]), 1))
# return self.conv(self.contract(x))将
SPP结构替换为SPPF,速度提升了两倍以上1
2
3
4
5
6
7
8
9
10
11
12
13
14
15
16
17
18
19
20
21
22
23
24
25
26
27
28
29
30
31
32
33
34
35## SPPF
class SPPF(nn.Module):
# Spatial Pyramid Pooling - Fast (SPPF) layer for YOLOv5 by Glenn Jocher
def __init__(self, c1, c2, k=5): # equivalent to SPP(k=(5, 9, 13))
super().__init__()
c_ = c1 // 2 # hidden channels
self.cv1 = Conv(c1, c_, 1, 1)
self.cv2 = Conv(c_ * 4, c2, 1, 1)
self.m = nn.MaxPool2d(kernel_size=k, stride=1, padding=k // 2) # 可以看到这个地方少了几个MaxPool层。
def forward(self, x):
x = self.cv1(x)
with warnings.catch_warnings():
warnings.simplefilter('ignore') # suppress torch 1.9.0 max_pool2d() warning
y1 = self.m(x)
y2 = self.m(y1)
return self.cv2(torch.cat((x, y1, y2, self.m(y2)), 1))
## 原来的SPP
class SPP(nn.Module):
# Spatial Pyramid Pooling (SPP) layer https://arxiv.org/abs/1406.4729
def __init__(self, c1, c2, k=(5, 9, 13)):
super().__init__()
c_ = c1 // 2 # hidden channels
self.cv1 = Conv(c1, c_, 1, 1)
self.cv2 = Conv(c_ * (len(k) + 1), c2, 1, 1)
self.m = nn.ModuleList([nn.MaxPool2d(kernel_size=x, stride=1, padding=x // 2) for x in k])
def forward(self, x):
x = self.cv1(x)
with warnings.catch_warnings():
warnings.simplefilter('ignore') # suppress torch 1.9.0 max_pool2d() warning
return self.cv2(torch.cat([x] + [m(x) for m in self.m], 1))
YOLOv5 数据增强
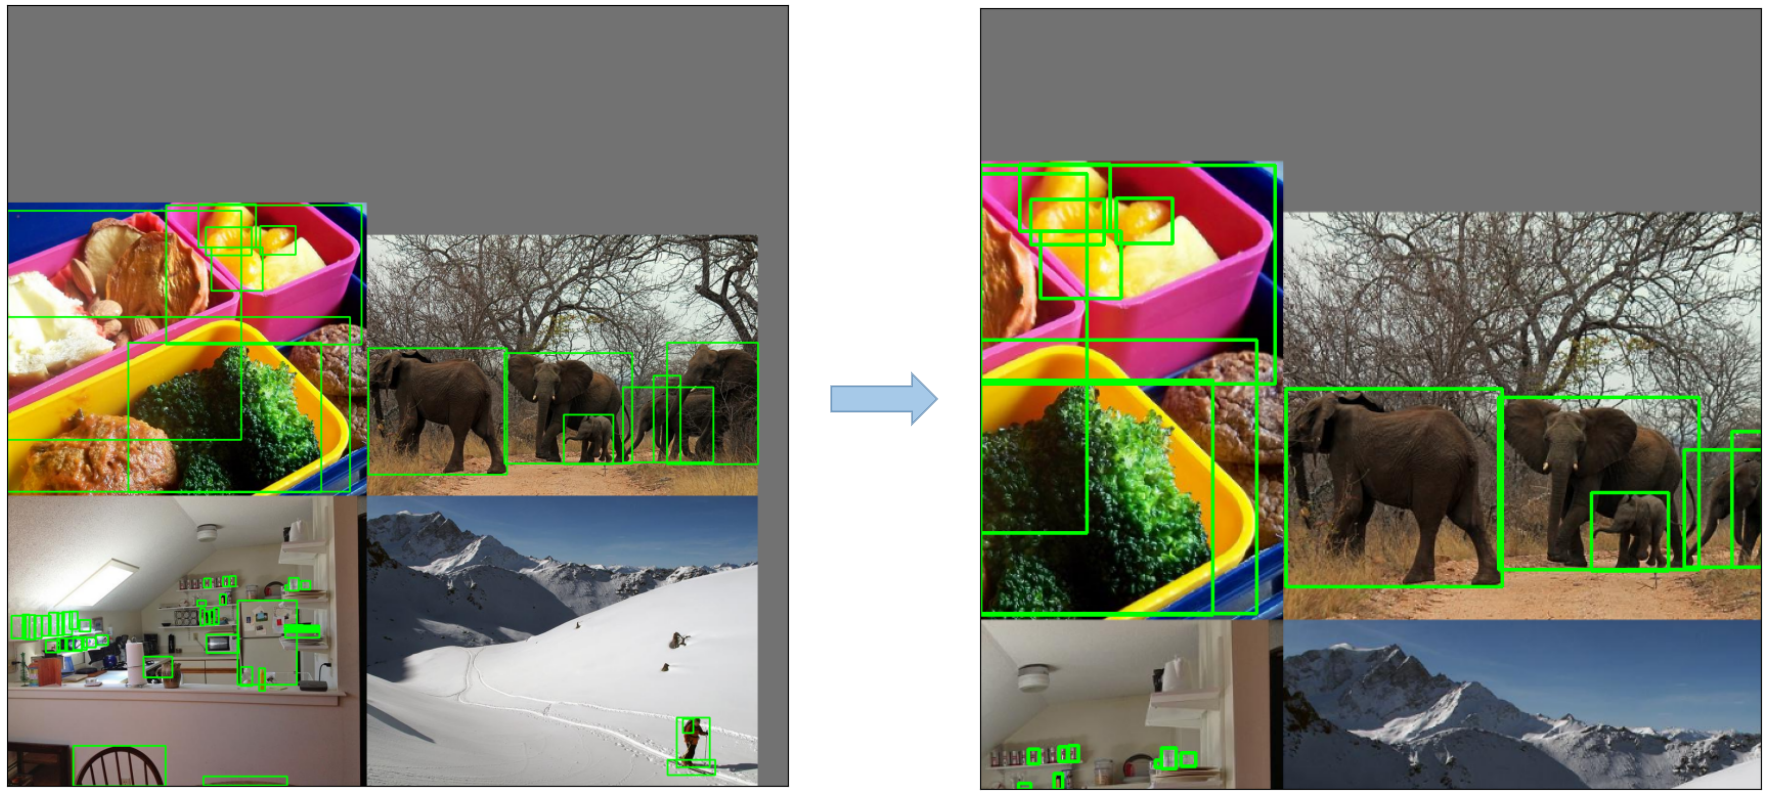
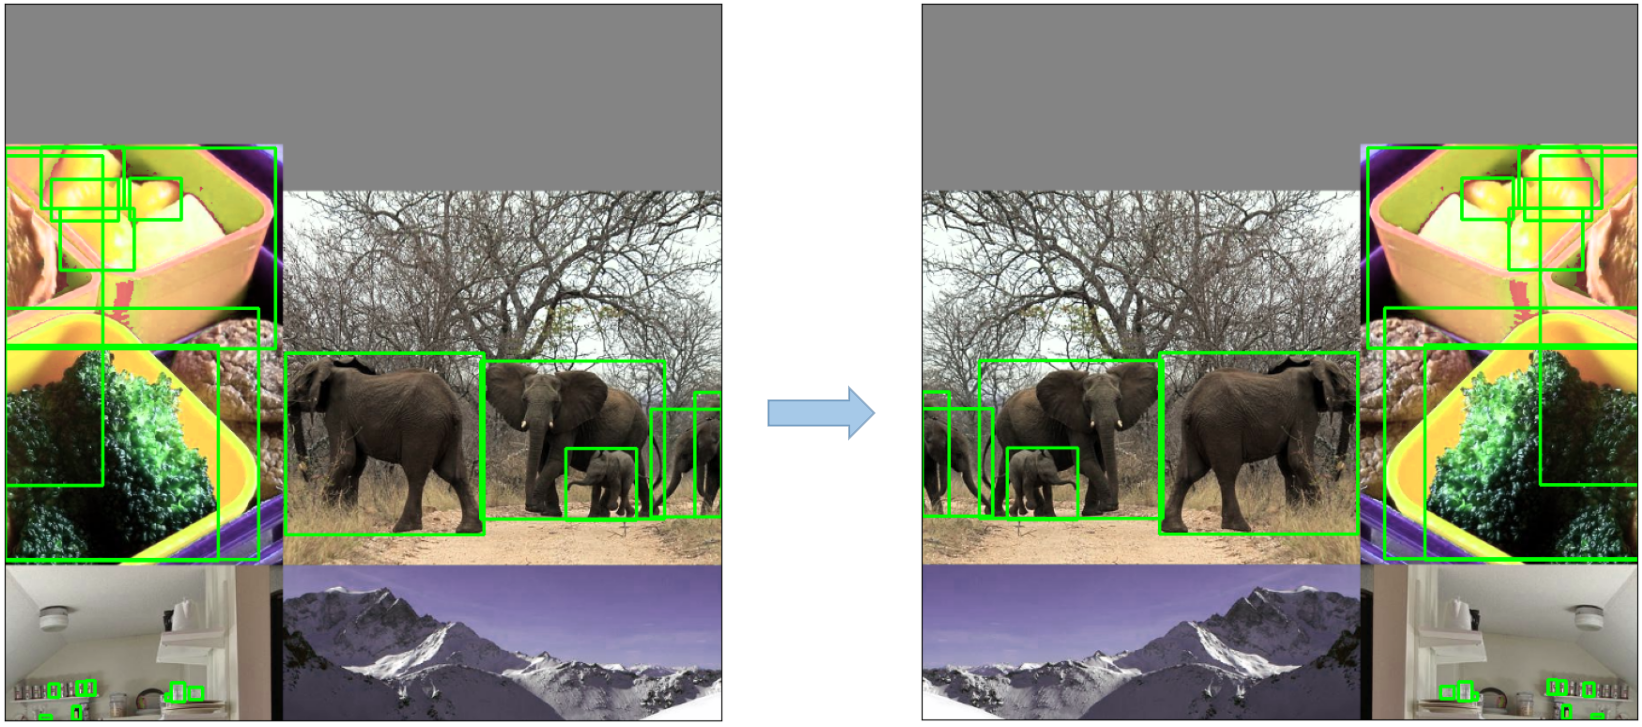
Mosaic 马赛克数据增强
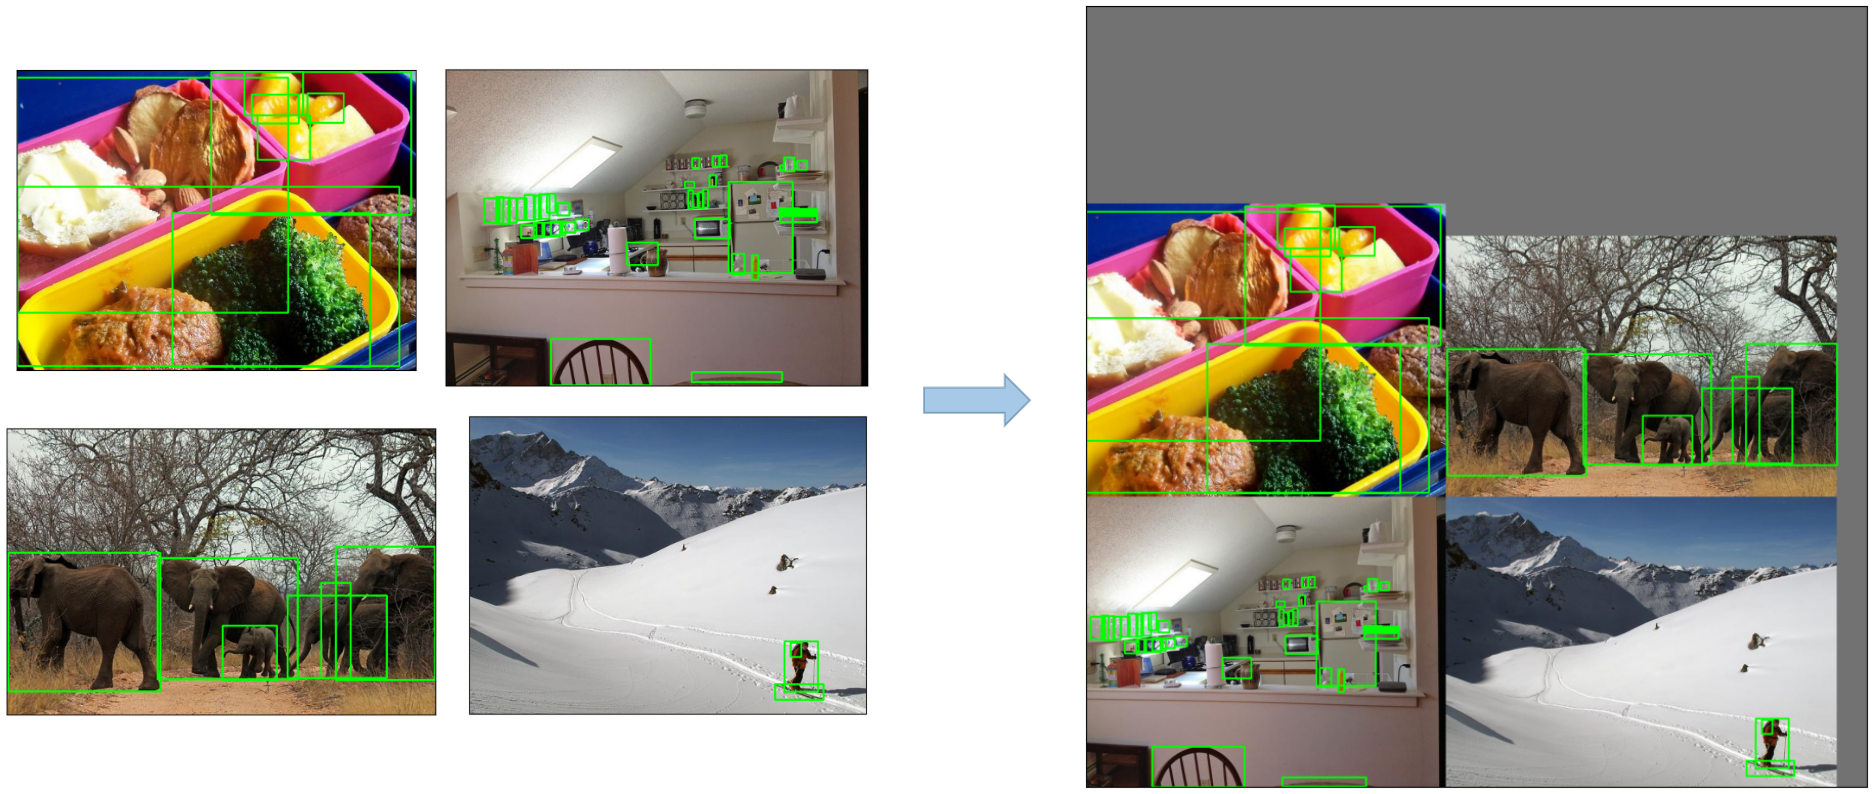
马赛克的数据增强:
1、随机选择4张图片,将图扩大为原来的两倍
2、进行裁减拼接,做成一张新的图片
3、重复以上步骤一个batch size次
马赛克数据增强的好处
1、扩充了数据集的数量
2、增加了小样本的数量:把大样本随机放缩成了小样本,因此增加了小样本的数量。
3、小样本更小:由于采用随机放缩,合并后,导致小样本的尺寸更小。
Copy Paste
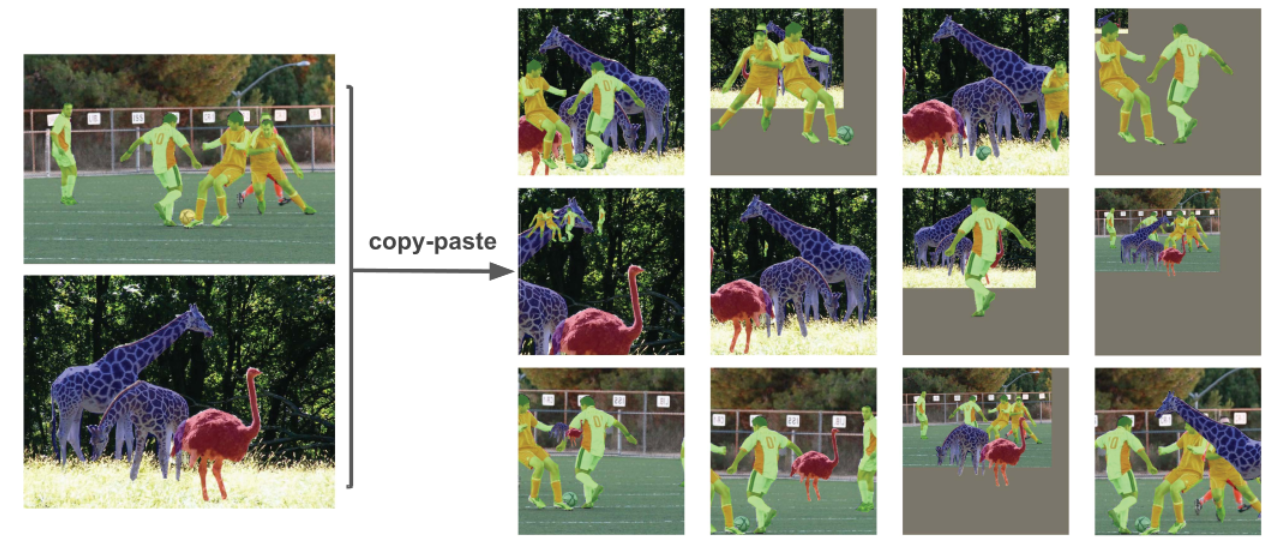
Copy Paste就是把其中某一张图片的某一部分给裁减出来,粘贴到另一张图片中
Random affine (Rotation, Scale, Translation and Shear,旋转、缩放、平移和剪切)
对图片随机的进行旋转、缩放、平衡、剪切
MixUp
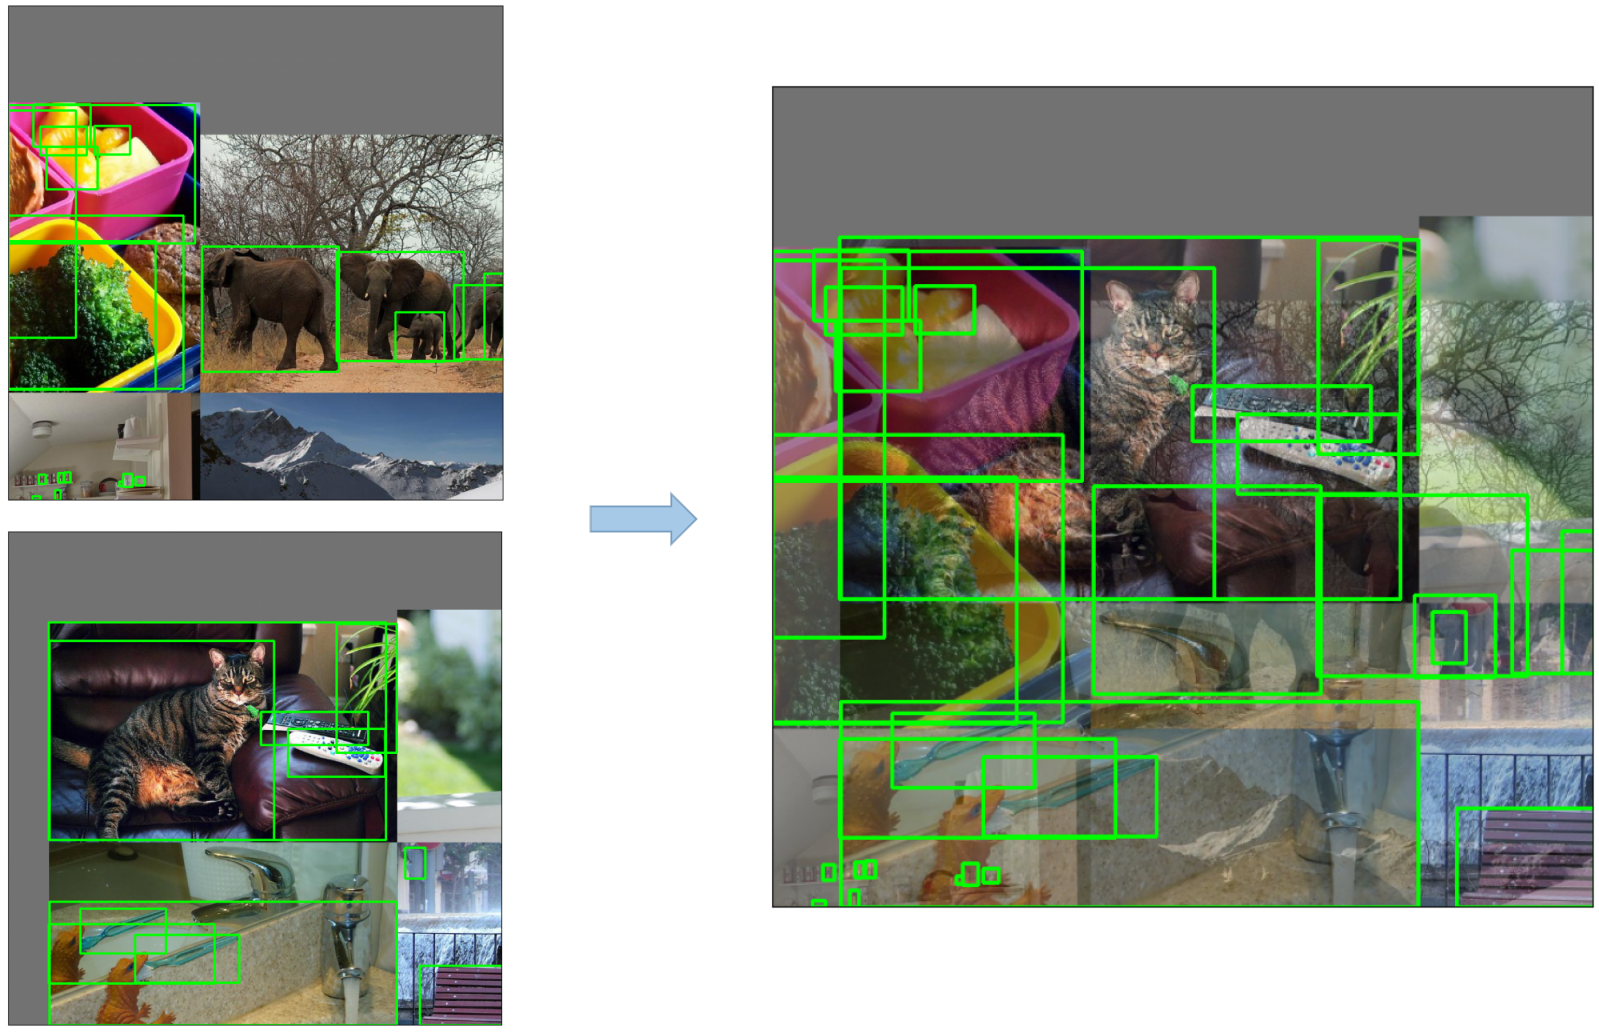
将一张图片与另一张图片进行混合,能过插值等方法
Albumentations
这是个API库,可以对图片进行相当多的操作
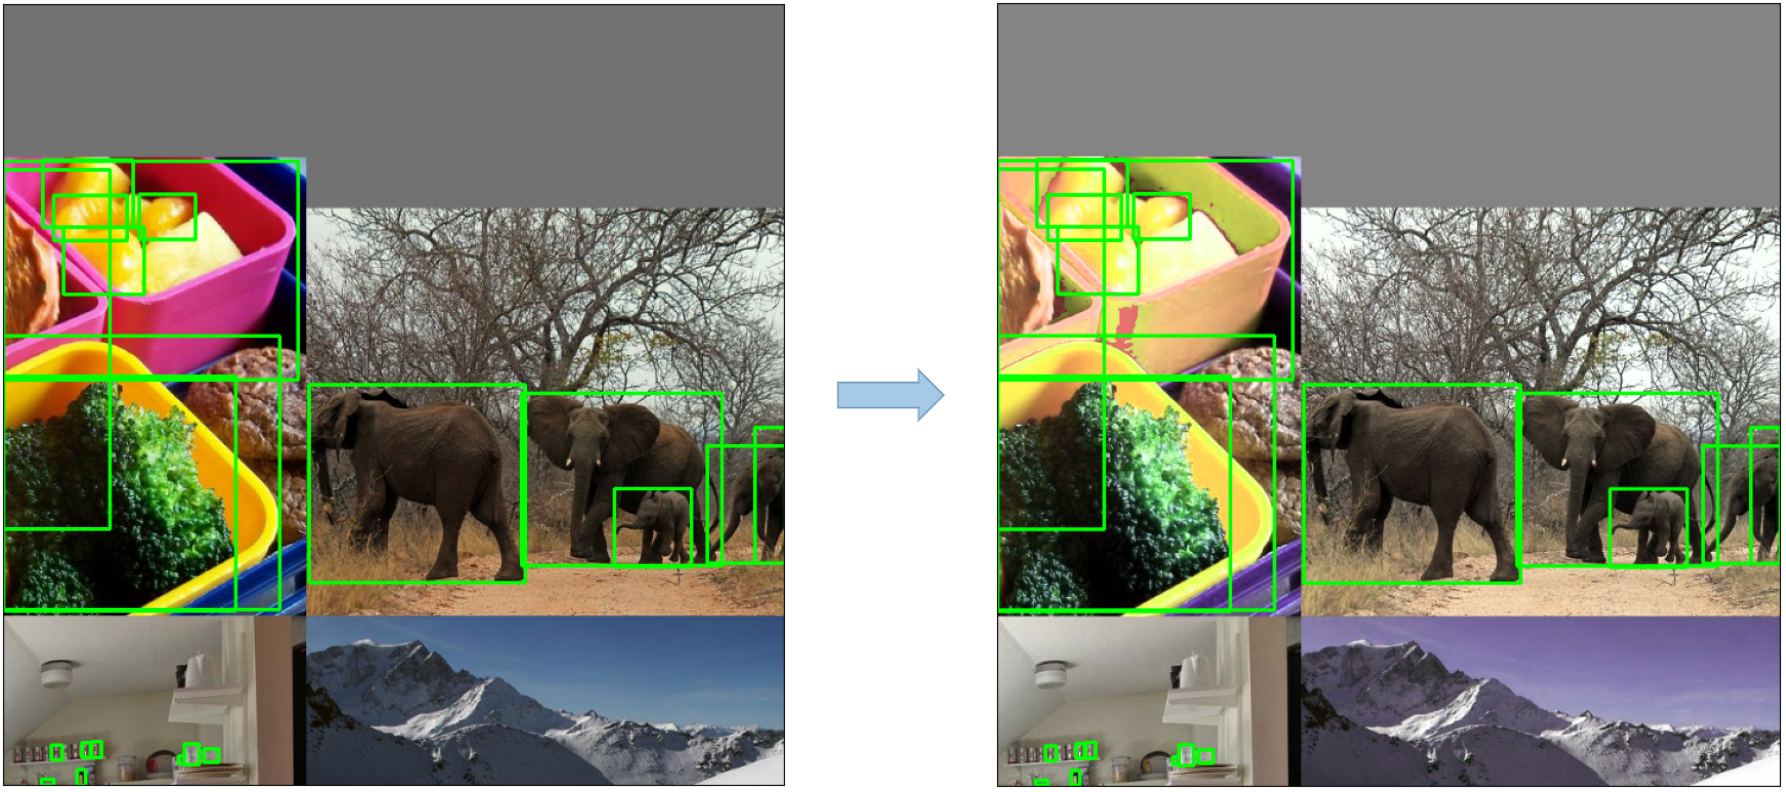
Augment HSV(Hue, Saturation, Value) 增强 HSV(色相、饱和度、值)
Random horizontal flip
YOLOv5 训练策略
- 多尺度训练(0.5~1.5x)
- AutoAnchor(用于训练自定义数据)
- Warmup and Cosine LR scheduler
- EMA(Exponential Moving Average)
- 混合精度
- Evolve 超参数
YOLOv5其他细节
1、LOSS的计算
YOLOv5的LOSS包含以下3个部分:
- Classes Loss (BCE Loss, Binary CrossEntropy Loss)
- Objectness Loss (BCE Loss)
- Location Loss (CIoU Loss)
总的LOSS为以上三者相加
2、对LOSS的平衡
对于三个预测层(P3, P4, P5)来说,他们的权重是不同的,平衡后的权重分别为 [4.0, 1.0, 0.4],即
3、消除网络敏感度
在YOLOv2和YOLOv3中,预测目标信息的计算公式为:
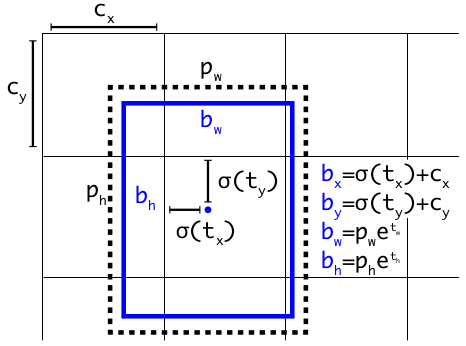
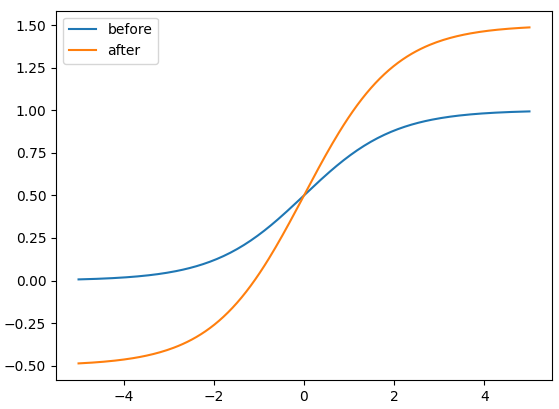
在 YOLOv5 中,公式为:
比较缩放前后的中心点偏移量。中心点偏移范围从 $(0, 1)$ 调整到 $(-0.5, 1.5)$。因此,offset 很容易得到 0 或 1。
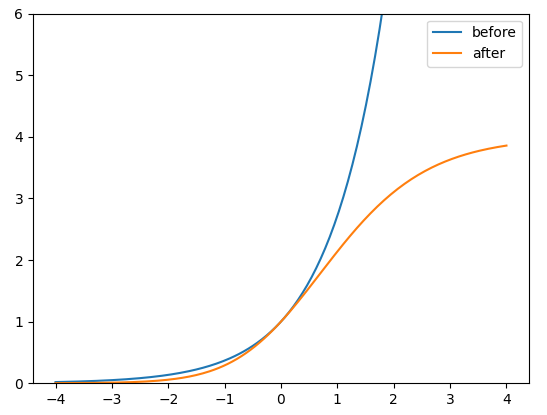
比较调整前后的高度和宽度缩放比例(相对于锚点)。最初的 yolo/darknet box 方程有一个严重的缺陷。宽度和高度是完全无界的,因为它们只是 $out=exp(in)$,这很危险,因为它可能导致失控梯度、不稳定性、NaN 损失,并最终导致训练完全损失。
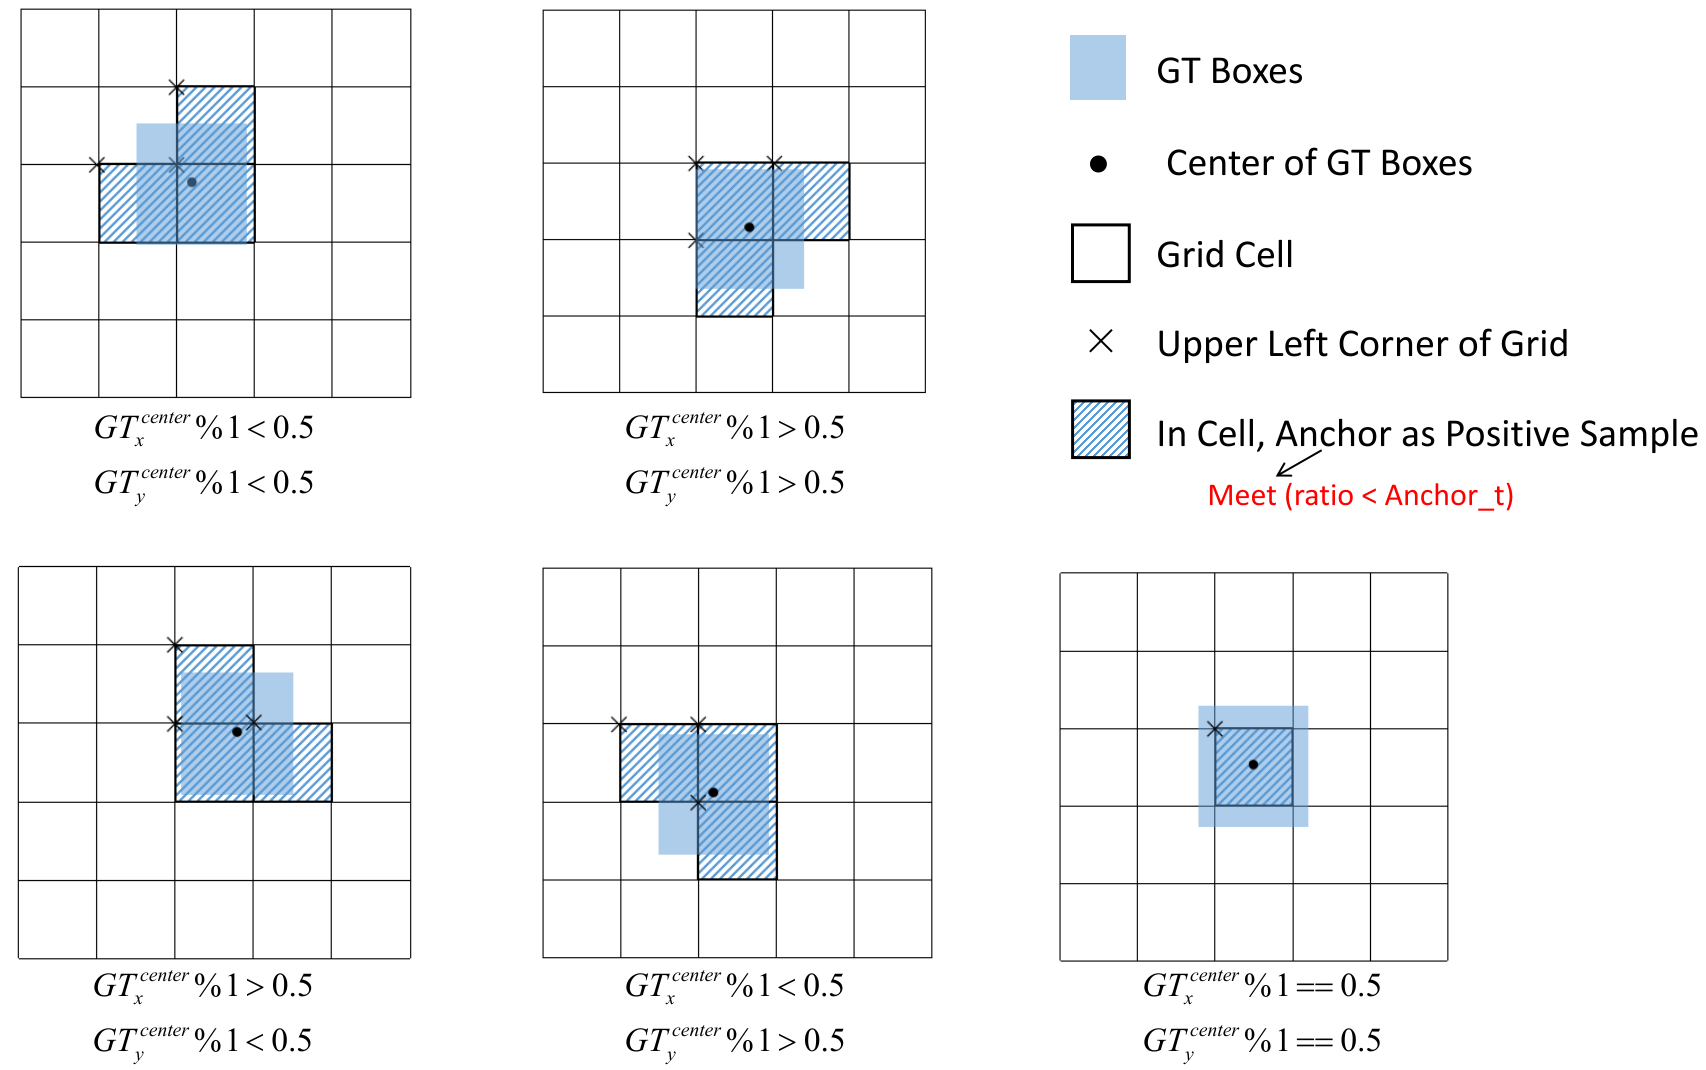
4、匹配正样本
计算 GT 和 Anchor Templates 的纵横比
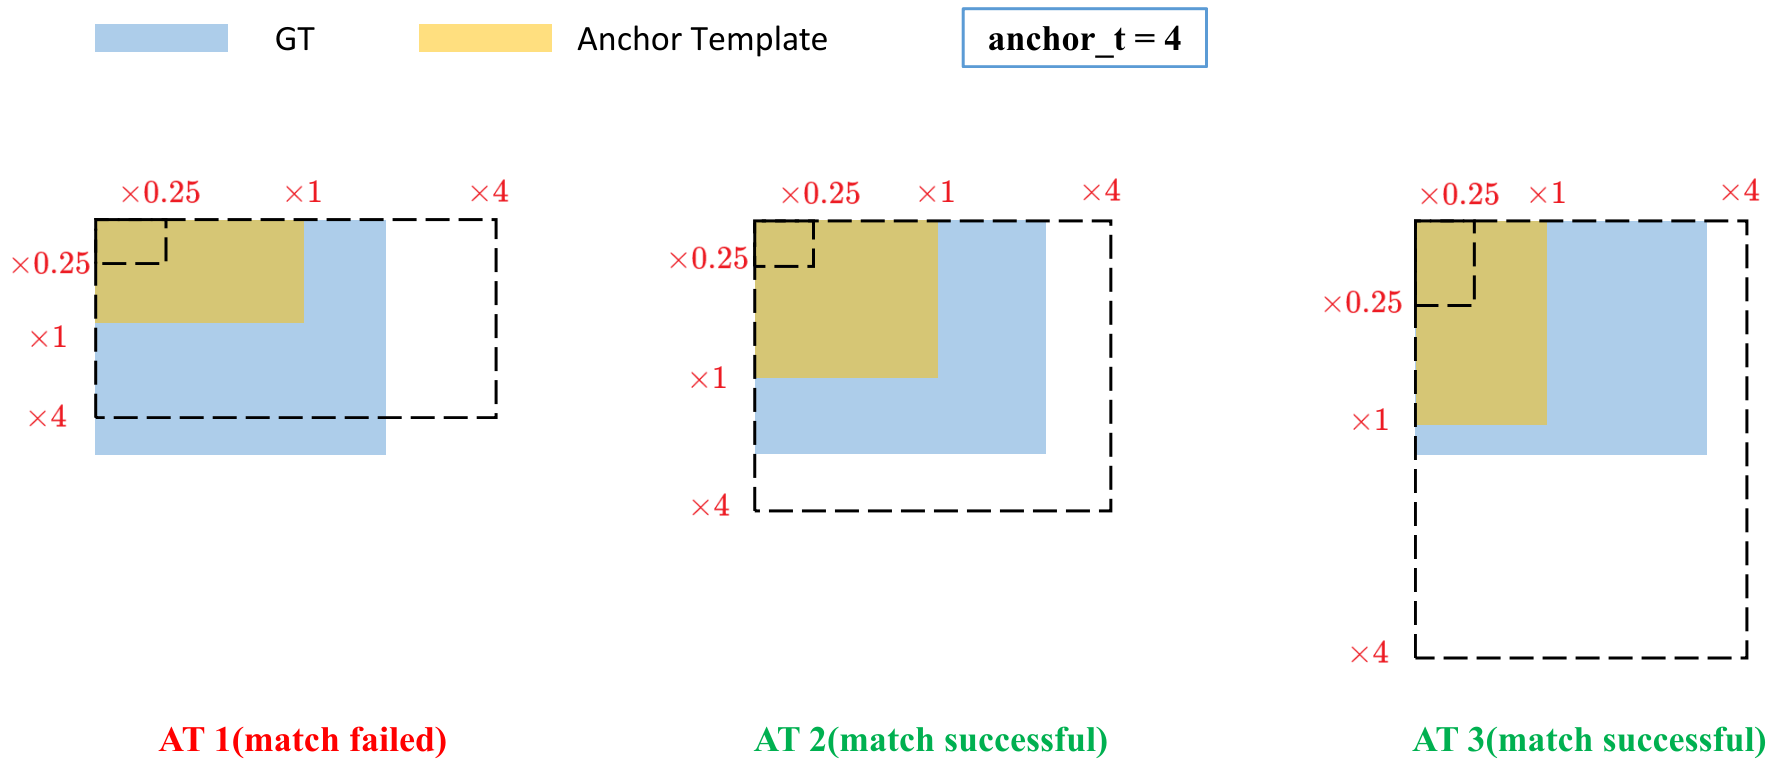
将匹配成功的锚模板分配给相应的grid cell
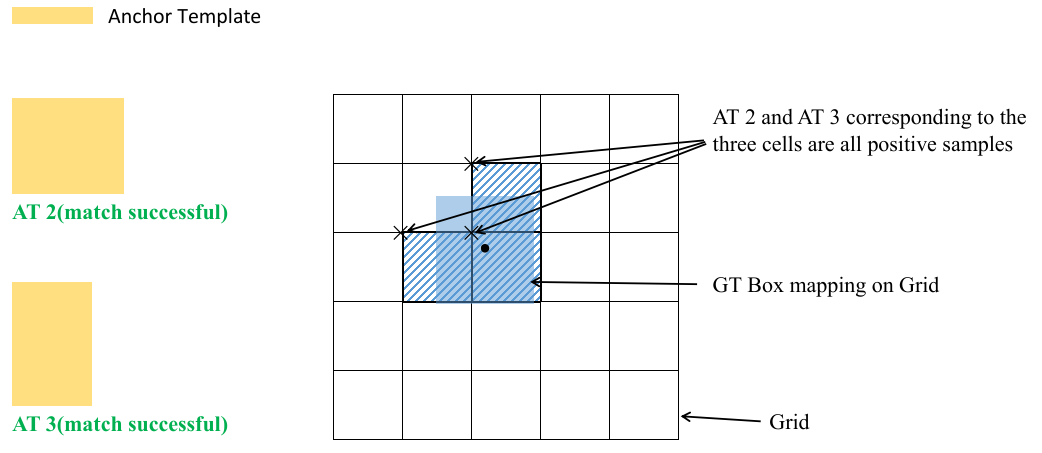
因为中心点偏移范围从 (0, 1) 调整到 (-0.5, 1.5)。 GT Box 可以分配给更多的锚点。